LED Lighting Projects
I’ve been playing with LED lighting in the past six months, and finally bit the bullet, pulled the trigger, and purchased enough LEDs, micro-controllers, motor controllers, and power supplies to replace the under-cabinet lighting in my kitchen (which has always sucked) and the aquarium lighting in my two aquariums.
There are LOTS of LED alternatives out there, but, after buying about a dozen different samples, I went with “10W White High Power 800LM LED SMD Lamp Bulb” sold by eBay seller “ac-rc” from Hong Kong, eBay item number 270588087597 as of early March 2011. They go for about $10 apiece, and compatible power supplies are cheap ($20 for a power supply that will handle 10 LEDs). These little postage-stamp sized LED devices put out a blindingly huge amount of light, and can get very hot. You need to mount them to an aluminum heat sink if you to avoid burning them out. While they are rated at 12 volts (which is what I will be using for the aquarium applications), if you run them at 9 volts (which is what I’m doing in the kitchen), they only get a bit warm (but still need heat sinking). I’m still playing with how much of a heat sink you need for continuous operation.
They sell different “color temperatures”, and I’m using “white” in the kitchen, but a more blue (10K) for the fish tanks. I will use an Arduino micro contr0ller (http://www.pololu.com/catalog/product/1614) and a motor driver (http://www.pololu.com/catalog/product/755) to create an artificial dawn and dusk.
It turns out that one of these LEDs every 12 inches is enough to provide good under-cabinet illumination, and there is enough dispersion that you do not need to aim them indirectly or use a diffusion device. I’ll be using 3 of them for the 2 foot wide sink area (rather than 2) because of the increased distance. The assembly is so thin that it can be mounted under the cabinet and still be hid by the under cabinet lip; much better than the old fluorescent lights.
Total cost for the under-cabinet lighting system is about $180; the smaller aquarium should cost about $200, and the larger one about $300. Given that LED lighting systems for aquariums can run over $1000, I’m pretty pleased with the idea. Of course, it is not done, yet, and some challenges remain (such as device cooling and concerns about salt water spray).
I’d be happy to talk with you about your LED project if you have questions.
LED Aquarium Lighting System
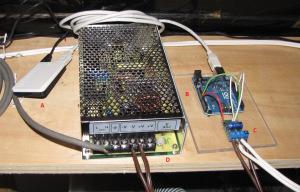
I am finished developing the LED Aquarium lighting system. I ended up using an Arduino and a power controller from Pololu. As you can see in the picture, the electronics consists of four parts:
A) a mini uninterrupted power supply, consisting of a wall-wart (not in picture) to charge a small NiMh battery. The power to charge the battery comes in on the black USB cable, and power is supplied to the Arduino via the white cable. This allows the Arduino to run without interruption during brief power outages (up to a few hours)
B) the Arduino computer/controller, mounted on a clear plastic sheet. This controls the timing and intensity of the LED lights
C) the motor/power controller. This converts the control signals from the Arduino so that the LEDs can be controlled properly.
D) the power supply. I’m using 11 V at the moment, although the LEDs are designed for 12 V.
Here is one of the tanks, illuminated by the LED lights. Notice, along the top, how there are many bright spots, rather than uniform illumination.

Here is a shot of the lighting system before it was installed, looking at it from “underneath”. There are 5 1o-watt LEDs, each of which is mounted on a heat sink. A second system, for a different tank, has 10 LEDs.

Here is a close-up of the lights installed above one of my tanks

The Arduino code counts out 24 hours, during which there is a 1 hour “dawn”, an 11 hour “day”, and a 1 hour “dusk”. For those of you who are interested, here is the code:
————————
// these are times in seconds
unsigned long dawnLength = 3600; // 60 * 60; // 1 hour dawn
unsigned long daylightLength = 36000; // 10 * 60 * 60; // 10 hour day (was 4294937760
unsigned long duskLength = 3600; // 60 * 60; // 1 hour dusk
unsigned long dayLength = 86400; // 24 * 60 * 60;
unsigned long dawnStart = 0;
unsigned long dayStart = dawnStart + dawnLength;
unsigned long duskStart = dayStart + daylightLength;
unsigned long nightStart = duskStart + duskLength;
// brightness levels
unsigned long moonLight = 1;
unsigned long sunLight = 200; // LEDs are running too hot: try to keep them cool
// time rate
unsigned long oneSec = 1000; // milli seconds: set nightStart) {
v = moonLight;
x = 4;
}
else if (secs > duskStart) {
v = map(secs – duskStart, 0, duskLength, sunLight, moonLight);
x = 3;
}
else if (secs > dayStart) {
v = sunLight;
x = 2;
}
else if (secs > dawnStart) {
v = map(secs – dawnStart, 0, dawnLength, moonLight, sunLight);
x = 1;
}
else {
v = moonLight;
x = 0;
}
if (testMode) {
int xxx = secs % 4; // mod
xxx = (xxx * 2) + 2;
analogWrite(pwm, xxx);
}
else {
analogWrite(pwm, v);
}
if (useSerial) {
Serial.print(x, DEC);
Serial.print(” Secs: “);
Serial.print(secs, DEC);
Serial.print(‘ ‘);
Serial.println(v, DEC);
}
}
void loop () {
currMS = millis();
if (currMS = oneSec) {
// one second just expired
secs = secs + 1;
prevMS = currMS;
SetLights();
}
// day wrap-around
if (secs >= dayLength) {
secs = 0;
SetLights();
}
}
LED Lighting Projects, the Sequel
I now have both of my aquariums lit by high intensity home-brewed LED lighting systems. One system has five LEDs, while the other has 10. I’m pleased both by the illumination (everyone agrees that the tanks look much better than with either fluorescent lights or with the metal halide and actinic lights) and the small size of the lighting fixtures. I have been used to huge lighting fixtures sitting atop the tanks, but these are so small (less than 2″ tall) and narrow (just 6 inches across) that you barely notice them. Access to the top surface of the tank, for feeding or maintenance, is also much better. All in all, a great move, and at perhaps 1/3 the cost of a retail system.
I’ve written the Arduino software to control the lights, so that they ramp up slowly at “dawn” and back down at “dusk”, but have not added that feature yet. I should have that done by the end of April. I also have the LED lighting system set up for installation under the cabinets in my kitchen, but need one full day when I can finish the wiring, since I do not want to get caught with that project half done.
Inexpensive Circular LED Mill/Drill Light
Anyone who uses a drill or mill knows how difficult it can be to get the right light on the part you are machining. If the light is near you, you cast shadows as you move your hands in to manipulate the piece, and the light fixture can get between you and the piece. If the light is behind the piece, then you can get glare in your eyes. The best approach is a circular light, mounted around the mill itself.
After seeing the amazing circular LED lights that my friend, Ralph Lemnah, made, I wanted one. I was not, however, willing to put as much work into my light as he did (he designed the circuits, designed the PC board, fabricated the PC boards, fabricated the enclosures, and then fabricated the mounting brackets!)
Then I stumbled across this item on eBay:
5050 85 LED Car Angel Eyes Light Circular Tube Ring Lamp 14W 220-240V 185MM
It costs $18 with free shipping. While it claims to require 220 V AC to run, it actually runs just fine on 110 V AC. It is manufactured with four quadrants, each of which contains 22 LEDs and its own little power supply board; each power supply produces 62 volts. This voltage is too high to re-purpose these devices for use with a regular wall wart.
Note that the insulation on these wires is the softest I have ever seen: you can strip the wires easily with your finger nails. You should not allow these wires to be exposed to rough use.
Here are some shots of the device after I disassembled it. Note the metal backed PC board used for the quadrants.


I made a wooden adapter plate so that I could mount it to my mill. I considered doing it “right”, with aluminum, but it seemed a shame to throw away so much aluminum to make the ring. The inner diameter of the plate just fits around the mill; I used a notched threaded rod as a set screw to keep the plate from dropping off of the mil (see red circle in the first picture)l. And, yes, the cable ties are ugly. Still, the whole process only took an hour or so. I was careful to use a cable tie to ensure that an accidental pull on the power wire would not affect the soft insulation on the original wires.

